Wednesday, July 18, 2012

Playing with Plastic

This year I want to do a green theme in my classroom, not just thinking of the color but also of decorating with only recycled materials.

So right now I'm continuing to work with plastic. Plastic and I have a love/hate relationship. It's such a harm to the planet, and yet to enjoy many things, I have to encourage its production.:( But lately, plastic and I are really having a good time together as I've discovered how much can be done with it.

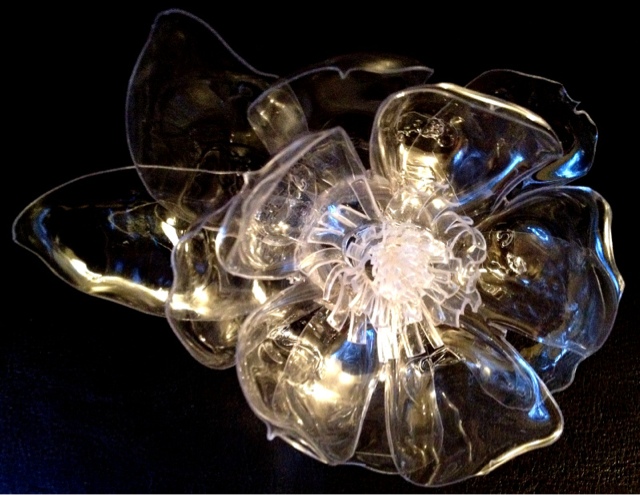
The following items were made using scissors, E-6000, tweezers, plastic bottles, and most importantly - a heat gun.

Flower Ring. all plastic


Lots of Flowers

My Favorite One

Beads!

I have a lot of time on my hands, right? Well, it's summer, and I'm a teacher, duh! :)

So, I'm looking for recycling ideas for classroom management and setup. Could you please comment with a tip for me? Thanks a bunch!

"Green is the new black."

Tuesday, July 3, 2012

Plastic Bottle Fantasy Flower 1 Tutorial

Hey guys! I'm such a weird person, but it's summer break, and what am I doing? Having fun with plastic bottles! I had no idea all that can be done with them. I've been making various fantasy flowers out of them (fantasy because they're not anatomically true to any real flower :P), so I'd like to show you how I made one that could almost be called a chrysanthemum.


This was made from a two-liter bottle of Sprite Zero. For this tutorial, I'll have to use one that my husband crushed I guess to show his manliness. :P


Here's what you need:


1) Two-liter bottle
2) E-6000 glue or any strong adhesive glue
3) Knife/scissors
4) Two Hershey kisses - NOT optional :P
5) Small cap from a hairspray bottle or other similar bottle
6) White Satin Rustoleum Universal Primer & Paint in One (or something similar if you want to paint your flower)
7) Acrylic paint if you want to paint
8) Double-sided tape if you want to stick your flower on a gift box, wall art, door sign, etc.

Assembly Instructions

1) Cut the top neck off and the bottom port off of the bottle (they actually have lines that make it easy to cut evenly).


2) Take the bottle neck and cut into MANY petals. Push the petals down flat.


3) Take the bottom portion and cut into many petals also. You will find that when you push them down, they twist into odd angles. This works to your advantage because you can push the petals back up into flower-like cup of petals.

4) Take the small cap and cut into many petals also. Bend petals downwards a bit at different angles to give the petals a natural look.

5) Using a strong adhesive glue, glue the bottom into the center of the bottle neck.


6) Next, glue the bottom of the small cap into the center.


7) Eat the two Hershey kisses (yes, eat them! You deserve it!) Then, wrap the two paper tails inside the aluminum and form a circular disc. Glue this into the center.


8) Optional: Spray a coat of Rustoleum's Primer & Paint on the flower.


9) Paint with acrylic brush-on paint or spray paint. I think in the future I would like to use an airbrush because it took FOREVER by hand.

10) Put double-sided tape on the bottom of the bottle cap on the underside of the flower and attach wherever you'd like - gift boxes, gift tins, wall art, your clothes........


Or maybe not! Unless you're going to a gypsy wedding! :P

If you have green ideas, please share! You can link them up by clicking on "By subject" or "By material" or you can just comment the URL here, and I'll link it for you! Thanks!

Livin' in a green world,

Thursday, June 28, 2012

New FB Page & I Have a Green Baby!

Just wanted to share this little ball of green that brings a smile to my face every morning. :)


Also, I've started a Green Classroom FB page. I hope you'll join it, and please let me know of any way you would like to share or collaborate here with tips you have on being a green teacher. Together we can make a difference! Teachers are super significant!


Monday, June 25, 2012

Fun Gift Idea with Clorox Containers

Today is my little brother's birthday (Happy Birthday, Nate! [Not that he'll get that message, since he doesn't even know about this blog :P]), so I decided to try my hand at a few things I've seen floating around on Pinterest.


First, I took a Clorox container, removed the paper and scrubbed it down really well.

Then, I tried some decoupage for the first time with Mod Podge and some candy wrappers from the best candy ever from Argentina (Bon Bon's and Marrocs!).

I knew it wasn't a smart idea from what I researched to use Mod Podge to attach aluminum to plastic since neither is porous, but I gave it a shot anyway. It kind of worked, kinda didn't. One wrapper never stuck well. But that's why you save these experiments for gifts for little brothers because they really won't care or notice either way!

Then I had seen this idea for tissue boxes, so I tried it with the Clorox container. I taped an undisclosed amount of $1 bills together and fed it through the mouth. The plastic lid is a little small, so it doesn't work perfectly. But I think my little bro will get a kick out of it anyway.

So, here's to recycling and gift-giving! If you have any cool ideas on gifts that involve recycling, please comment or link the post under "By Subject" or "By Material." Thanks!

Update - Nathan loved it! He's a cool brother like that. :)

Keep it green!

Tuesday, June 19, 2012

Recycled Designer Dresses

School's out, it's vacation time, so my hubby and I headed to Argentina to visit his family. At the Atlanta airport, in concourse E, I saw the most spectacular thing - recycled designer dresses! Apparently, an artist named Nancy Judd of Recycle Runaway, has an amazing talent of creating gorgeous clothing out of plastic bags, old tires, newspapers, magazines, cereal boxes, and other recycled materials. Here are three of the many incredible displays I found while in Atlanta:


Happy Recycling!


Friday, June 15, 2012

Bottle Caps and Foam Packaging Pot Drainage

As the school year ends, it's garden time! And I've found the uses for bottle caps still continue even outside of the classroom.


You know how you need to add pebbles or broken pottery to serve as drainage in your plant containers? Well, I've found that bottle caps and/or foam packaging work great as a substitute. They're free, eco-friendly, and so far my plants look great!


Do you have some great recycling tips in the garden to share? Please let me know! Happy Summer!


Monday, June 4, 2012

Plastic Lid Facts Game Giveaway at Hojo's Blog!

Heather from Hojo's Teaching Adventures was so kind to recently spotlight my math fact bottle caps idea and even better yet, she is doing her own giveaway of addition math fact plastic lids. Yay for green teachers!! I hope you will take a quick second to participate in her giveaway (it ends this Wednesday, June 6th, 2012). All you have to do is follow one of her social sites - super easy! Click the picture for a chance to be a lean, green, teaching machine next year with this recycling math game!


Related Posts Plugin for WordPress, Blogger...