Showing posts with label Bottles. Show all posts

Friday, January 18, 2013

Bowling Math


Hey, Green Friends! I apologize for being absent for so long at this blog, but I'm here now at least, and I hope you all have been well!

I've seen this green math-tastic idea for awhile now, and wanted to try my hand at it. Students knock down pins that contain some sort of math objective... pins can have numbers they need to add or subtract, math fact problems, or students can try to create a certain number using the numbers on the pins they knock down. We're practicing estimation and rounding, so I customized this game for that purpose.

What I Did:

I drink those DanActiv yogurts in the morning, although I know I've got to stop with all the useless plastic they create. But for now, I've at least transformed them into a fun learning game for my students.

After I washed the bottles and took of their wrappers, I created some labels using Avery.com and labels 5410.

I found the bowling ball at Goodwill, and the find made me so excited, I had to do a happy dance right there in the toy section which I immediately regretted. :P

How to Play:

1) Students take turns trying to knock down the pins.
2) After their roll, they pick up two of the bottles that fell down. They round and add them. Their partner(s) use a calculator to check.
3) If they're correct and made a strike, they earn two points. If they're correct and didn't make a strike, they earn one point. And if they're incorrect, they earn no points.
4) Continue play until center or group time is up. The winner with most points wins.

My students used dry-erase boards for their work, but I've created a recording sheet, also, that you can use for whatever skill your students are practicing with this game. Just click the image for your copy.


Thanks for stopping by, green teachers!


Sunday, September 23, 2012

Recycling is a HOOT

So, I'm sure you've noticed, but owls are EVERYWHERE. So I thought, why not make a compilation of lots of cool ways that you can recycle while making those cute little birds that everyone seems to love right now. So, here goes:

It's fall now, so what could be better than toilet tube owls? These are by Apartment Therapy.

How about some egg carton owls by My Owl Barn?

Go to Teachers Notebook for a free owl-themed recycling poster by Lucky Girl.

This paper bag owl pinata is just waiting for a fiesta! Tutorial is by Inspired Mama Musings.

Adorable owl-themed desk organizer by Fave Crafts

Love these TP Christmas Owls by Con M de Mujer.

This just blows me away. I want to try it right now! By Recycle Renew Reuse Mother Earth Projects.

These TP owls by Fun Family Crafts are so wonky and cute!

Go to Find Make Do to see many delightful created by Robyn Stewardson out of kitchen metal scraps.

And here's an owl door sign I made out of various recycled materials that is posted right here at The Green Classroom.

Don't forget - Recycling is a Hoot!


Sunday, August 26, 2012

Recycled Door Signs - Green Theme Day 1

I have been so preoccupied with getting my classroom ready, that I have totally abandoned my blogs (my apologies!). But I do want to share some things I have done, so this week, I am going to try my best to share one post every day about how I have tried to be more green in my classroom.

Today's post is all about door signs! There are so many items out there than can be reused without having to give Hobby Lobby a third of your paycheck!

 This one I made for my partner teacher. She is so awesome and such a help that I have to do what I can to make up the difference. Here's what I used: a dish from Goodwill (primed and painted), bottle caps (painted white), plastic packaging, bubble wrap foam packaging, used buttons, straws (the eyebrows), twisted soda bottle strips (molded with a heat gun), and soda bottle leaves (cut out and heat gun molded).
 
 I also made her a large sign for the outside wall of our portable. First, I painted corrugated plastic (not recycled), printed out and laminated her name, attached and covered everything with outdoor Mod Podge. Then, for the recycling, the flowers are all an assortment of different soda bottle ends, cut and molded with a heat gun. I used bottle caps and buttons as centers. I used a combination of acrylic paint that was painted by hand and also airbrushed. The small flowers are actually bottle caps I cut open with heavy duty scissors. Everything was coated several times with a clear enamel spray. So far, so good!

  
 Here's mine.

 
 And here's my door sign. It contains used buttons, bottle caps, soda bottle, and a used dish from Goodwill that was primed and painted.

Here's a sign I made for my mom as she enters the classroom again after surviving cancer. Includes: soda bottles, candy wrapper, a pan from Goodwill, and hole punched circles from some old business cards.


So, here's a look at the outside of my green-themed classroom. Hope you'll stay tuned to see the inside this week!

Keep it green!
.

Wednesday, July 18, 2012

Playing with Plastic

This year I want to do a green theme in my classroom, not just thinking of the color but also of decorating with only recycled materials.

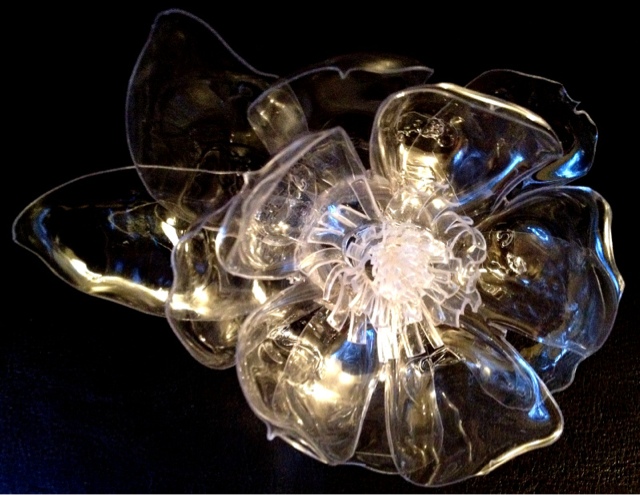
So right now I'm continuing to work with plastic. Plastic and I have a love/hate relationship. It's such a harm to the planet, and yet to enjoy many things, I have to encourage its production.:( But lately, plastic and I are really having a good time together as I've discovered how much can be done with it.

The following items were made using scissors, E-6000, tweezers, plastic bottles, and most importantly - a heat gun.

Flower Ring. all plastic


Lots of Flowers

My Favorite One

Beads!

I have a lot of time on my hands, right? Well, it's summer, and I'm a teacher, duh! :)

So, I'm looking for recycling ideas for classroom management and setup. Could you please comment with a tip for me? Thanks a bunch!

"Green is the new black."

Monday, June 25, 2012

Fun Gift Idea with Clorox Containers

Today is my little brother's birthday (Happy Birthday, Nate! [Not that he'll get that message, since he doesn't even know about this blog :P]), so I decided to try my hand at a few things I've seen floating around on Pinterest.


First, I took a Clorox container, removed the paper and scrubbed it down really well.

Then, I tried some decoupage for the first time with Mod Podge and some candy wrappers from the best candy ever from Argentina (Bon Bon's and Marrocs!).

I knew it wasn't a smart idea from what I researched to use Mod Podge to attach aluminum to plastic since neither is porous, but I gave it a shot anyway. It kind of worked, kinda didn't. One wrapper never stuck well. But that's why you save these experiments for gifts for little brothers because they really won't care or notice either way!

Then I had seen this idea for tissue boxes, so I tried it with the Clorox container. I taped an undisclosed amount of $1 bills together and fed it through the mouth. The plastic lid is a little small, so it doesn't work perfectly. But I think my little bro will get a kick out of it anyway.

So, here's to recycling and gift-giving! If you have any cool ideas on gifts that involve recycling, please comment or link the post under "By Subject" or "By Material." Thanks!

Update - Nathan loved it! He's a cool brother like that. :)

Keep it green!

Saturday, January 21, 2012

Turn Plastic Bottles into Magical Learning!

There is never an excuse for throwing away plastic bottles because there is always a reason to use them in your classroom. There are so many fantastic resources out there by super creative individuals for turning bottles into educational tools, and in this post I will try to touch on as many as I know about. So, peruse the ideas below and start saving your bottles!


DISCOVERY BOTTLES ARE THE BOMB!
So much fun! All you need are bottles some kind of fun material (rice, pom-poms, sprinkles, etc.). I got my start from Tunstall's Teaching Tidbits who has the mother of all posts on discovery bottles. You'll need to scroll down to see the post because I'm having issues with the actual post showing up.


DSC_0274 copy-cs3-blog


Do you have an awesome classroom activity involving bottles? Please link it up here - http://yourgreenclassroom.blogspot.com/p/bottles.html?zx=8aed6731523b0be9.

And please feel free to link up any other green classroom ideas anywhere you see fit in this blog!

Like to guest blog? I would love for you to at The Green Classroom! Please let me know at tabitha@flapjacklapbooks.com.


Saturday, December 10, 2011

Soda Bottle Rain Gauges (Catchers)

Have fun catching rain with soda bottle rain gauges (catchers).


1) All you need is a small or large soda bottle. Cut the mouth off at the top where the bottle starts becoming smaller.

2) Afterwards, take the mouth of the bottle and flip it down inside the bottles to serve as a funnel for the pebbles.

3) Add small pebbles to the bottom of the bottle through the funnel top to give the bottle some weight.

4) Start marking the bottle with a permanent marker using centimeter or inches. * Be sure to start the markings above the bottom grooves of the bottle so you will have a consistent reading.

5) Do a rain dance and see what happens!


Obviously these rain gauges are not a standard measure, but they will give students a physical demonstration of what one is.

Happy Recycling!

Related Posts Plugin for WordPress, Blogger...